


Premiere Pro is one of the most popular NLE (non-linear editing) platforms out there, and for a good reason. It’s packed with tons of features that allow pretty much anyone to edit video like a pro.
Unfortunately, with great power comes great CPU requirements, which is why many editors find themselves facing tons of glitches and slowdowns when they try to edit HD video projects in Premiere.
Thankfully, there are a lot of tips and hacks that you can use to improve Premiere Pro’s performance and speed. These range from tweaking small software settings to full hardware upgrades.
Now, before you go running thinking that you’ll have to buy a whole new computer, most people find that with just a little settings optimization, their overall performance massively improves.
But first, what is it that’s making Premiere run so slow?
Common issues that slow down Premiere Pro’s performance
There are a lot of reasons you may be experiencing sluggish performance when trying to edit in Premiere Pro.
Most of these issues come down to how much RAM Premiere Pro is using and how fast your GPU (graphics processing unit) can perform. These are the biggest bottlenecks in your editing system that can choke the performance of powerful programs like Premiere and make it difficult to work on solo projects, never mind steam it over Zoom and work with your team.
However, it can also be a lot of little things too. Are you editing a project with tons of special effects? Are you trying to edit full resolution 6k clips instead of using proxies? These are issues that can choke even the most powerful editing machines, and they are easily fixable.
We’ve outlined our top ten tips that can help improve your performance speed in Premiere, most of which won’t have you pricing out a new graphics card anytime soon.
Ten tips to help you speed up Adobe Premiere Pro’s performance
Tip #1: Clean out your media cache
Whenever you import media into Premiere Pro, it creates cache versions of these files that make it easier for Premiere to access the files during editing. Unfortunately, these copycat files can quickly build up and take up tons of space on your CPU.
Thankfully, Premiere Pro makes it easy to manage these cached files. First, you’ll want to open your “Preferences” window and select “Media Cache.”
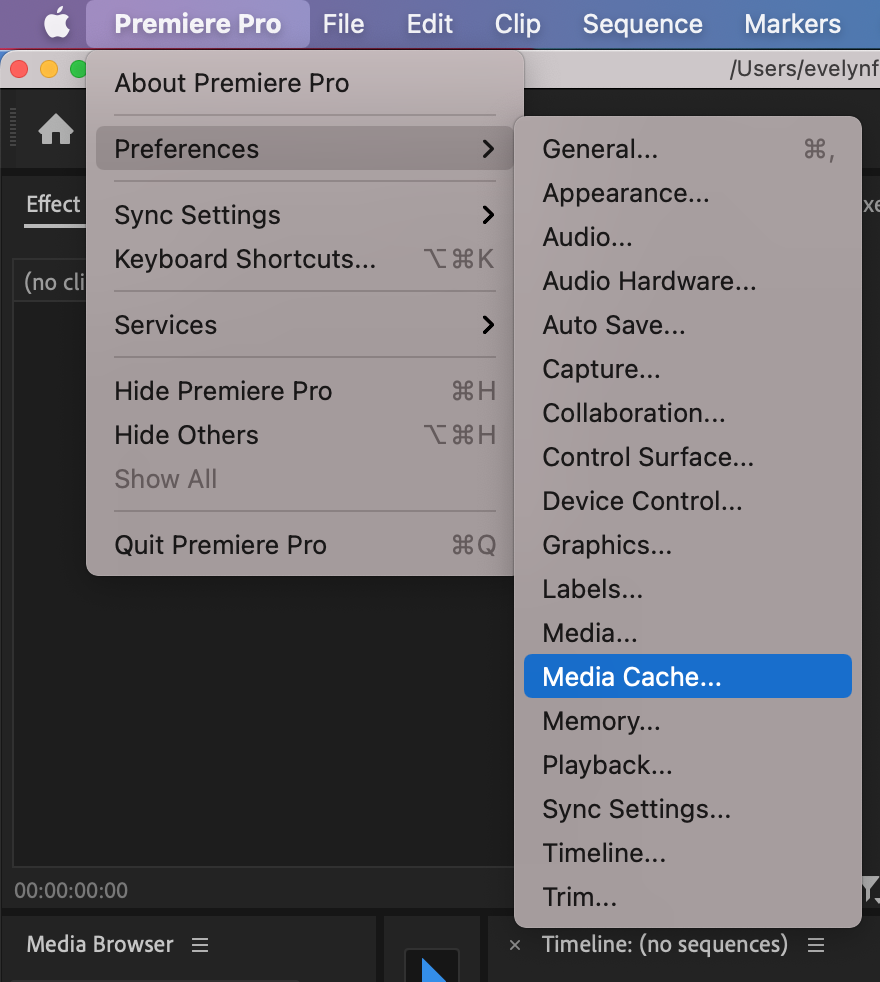
You will now see your media cache preference window. To free up space, click on the “Delete…” button next to “Clear Media Cache Files.” You will now get a pop-up window that will allow you to either clear out your unused media cache files or clear out all media cache files.
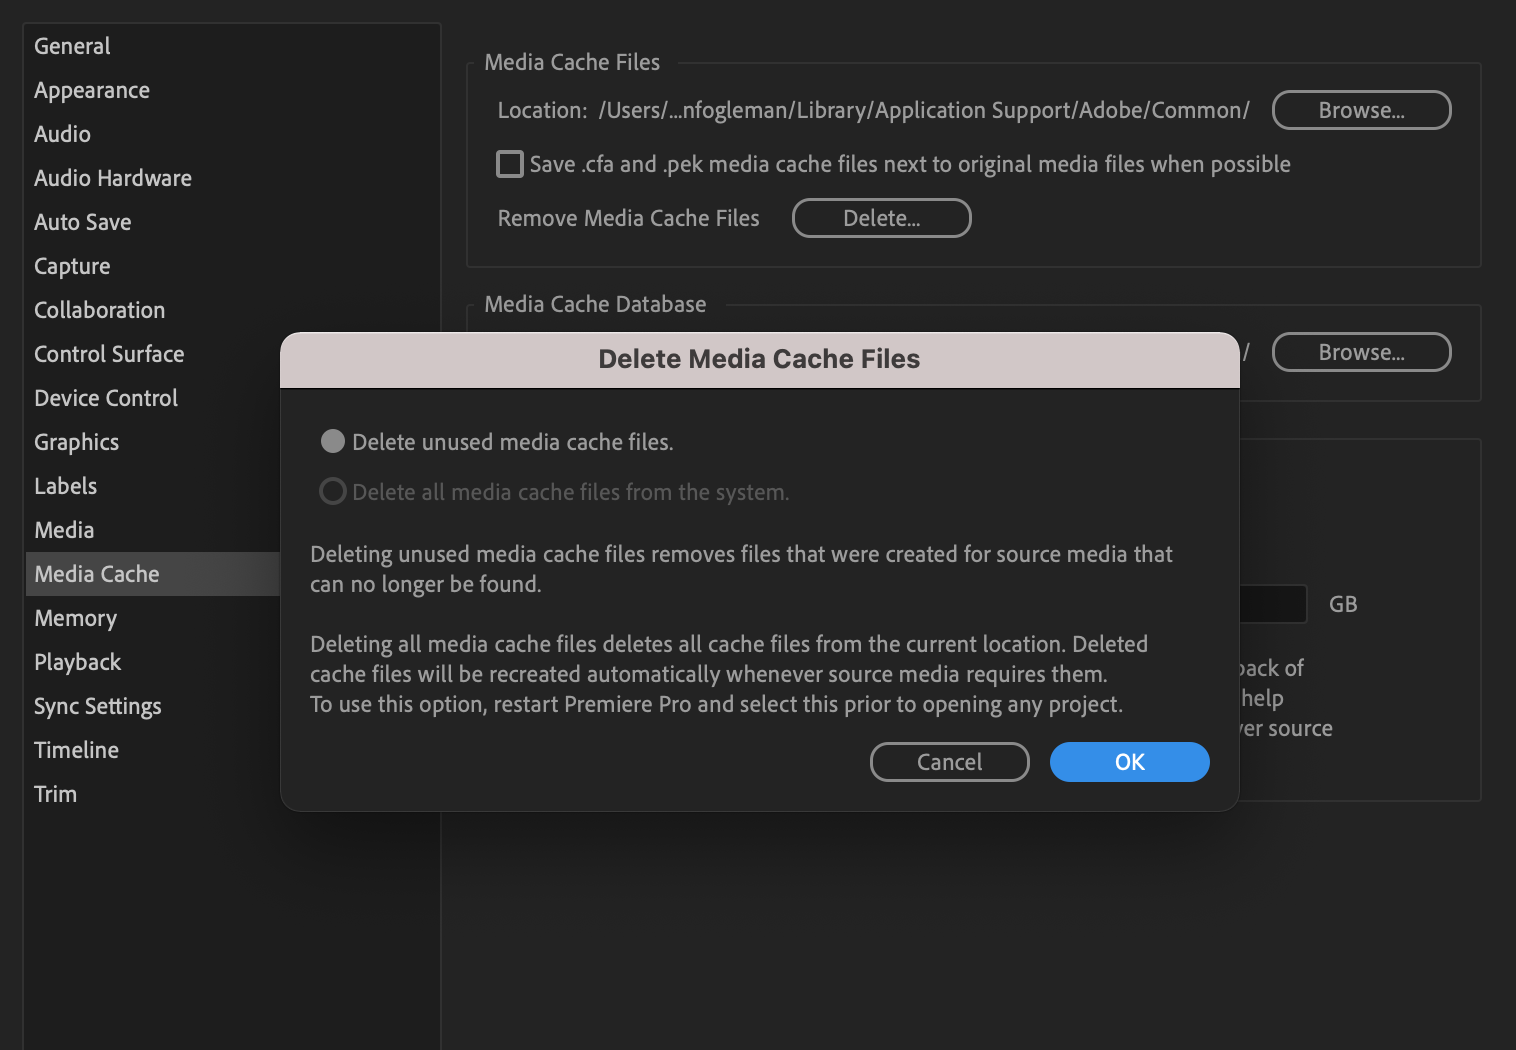
Just deleting unused cache files may be enough to see a significant improvement in speed, especially if you work on multiple projects.
Tip #2: Move your media cache to a new location
Another reliable way to free up space and increase your speed is to move your media cache files to a different location (other than your CPU).
You can do this by opening the media cache preferences window and clicking “Browse…” next to the location address. This will allow you to select a new location for Premiere Pro to save your media cache files.
Tip #3: Enable GPU acceleration
Another great trick to speed up render times and create previews faster is to enable GPU acceleration in Premiere. Lots of effects and plugins need GPU acceleration to run properly, so be sure to have this enabled if you’re working with these tools.
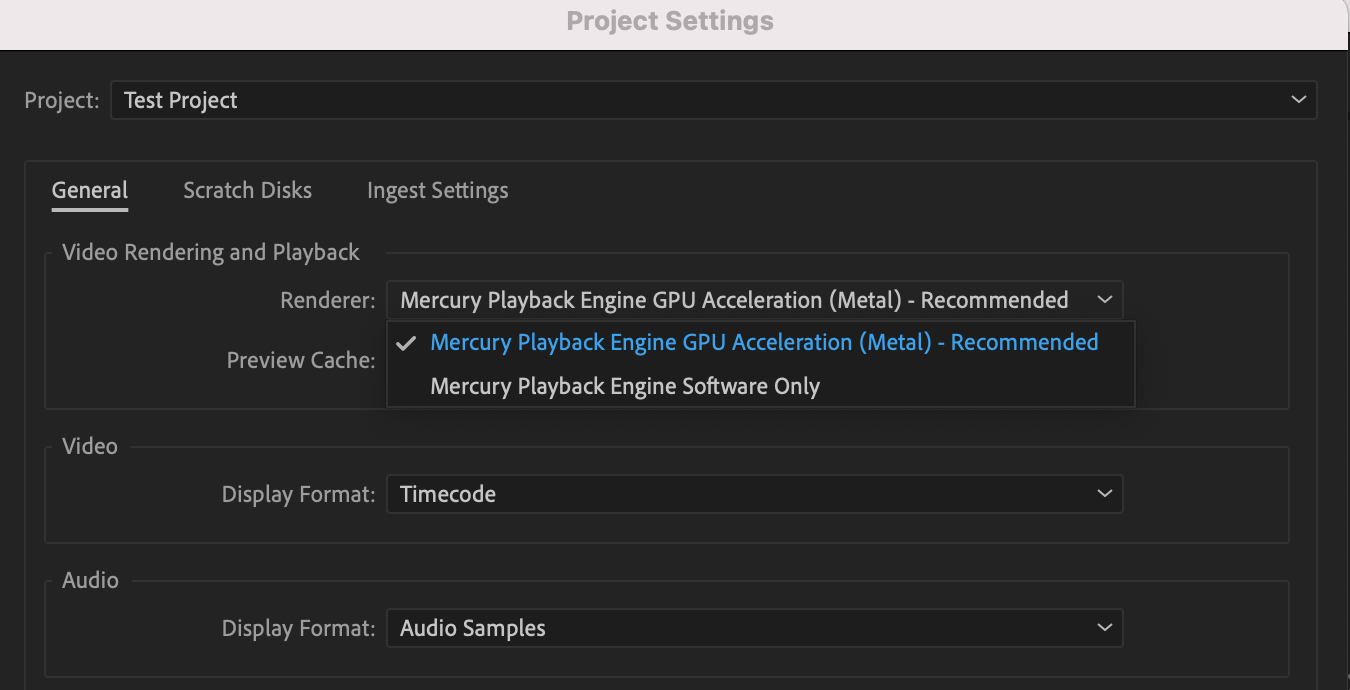
To enable GPU acceleration, go to “File” then “Project Settings” and select “General” in the dropdown menu. You will now get your Project Settings pop-up window.
Under “Video Rendering and Playback,” you will see a dropdown menu next to “Renderer.” Open this dropdown and make sure you enable “Mercury Playback Engine GPU Acceleration.”
Now, be careful not to have this enabled all the time if you tend to have software or hardware stability issues, as it can cause program crashes.
Create together remotely, in real time
Tip #4: Lower your playback resolution
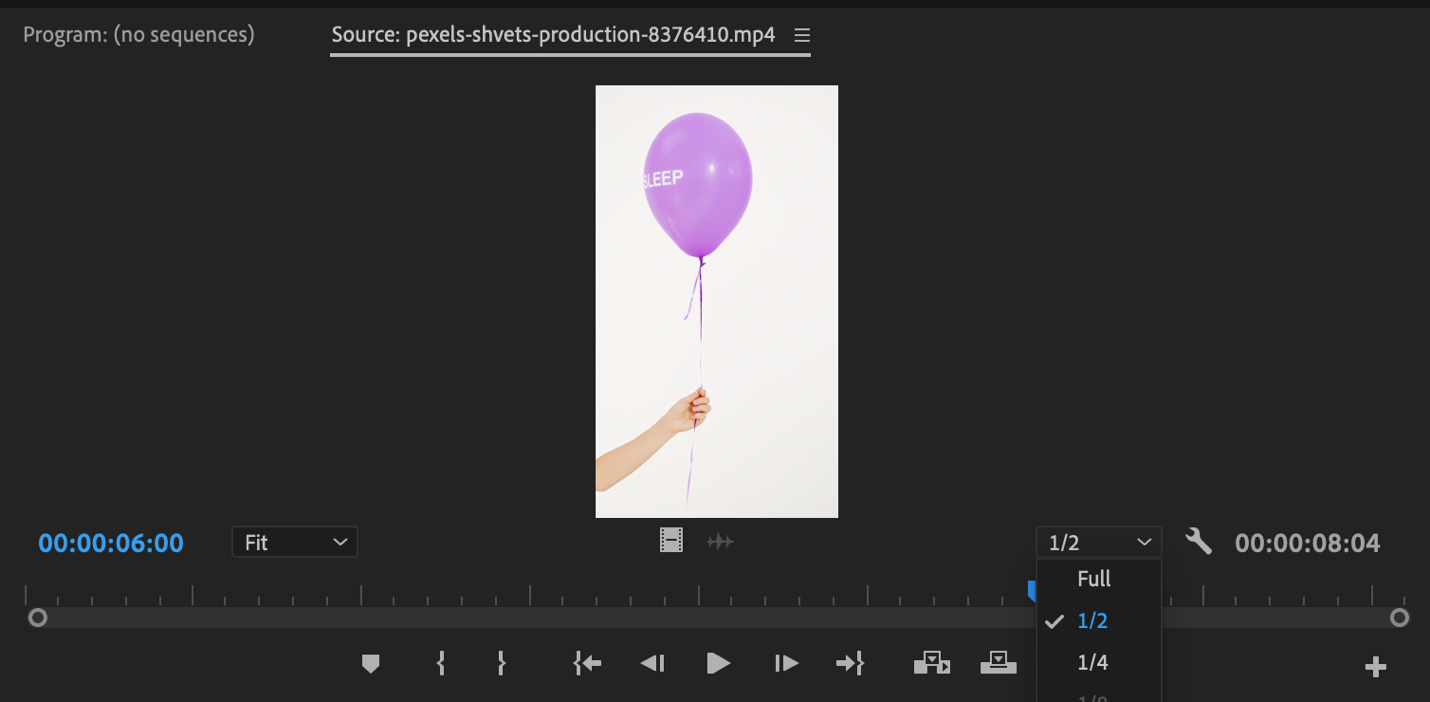
If you’re having lots of lag or skipping during project playback, try reducing your playback resolution from “Full” to ½ or ¼. This won’t affect the final resolution of your project; it will simply downgrade the preview resolution to improve performance.
You can change your playback resolution by clicking the dropdown menu at the bottom of your preview window and selecting your desired resolution ratio.
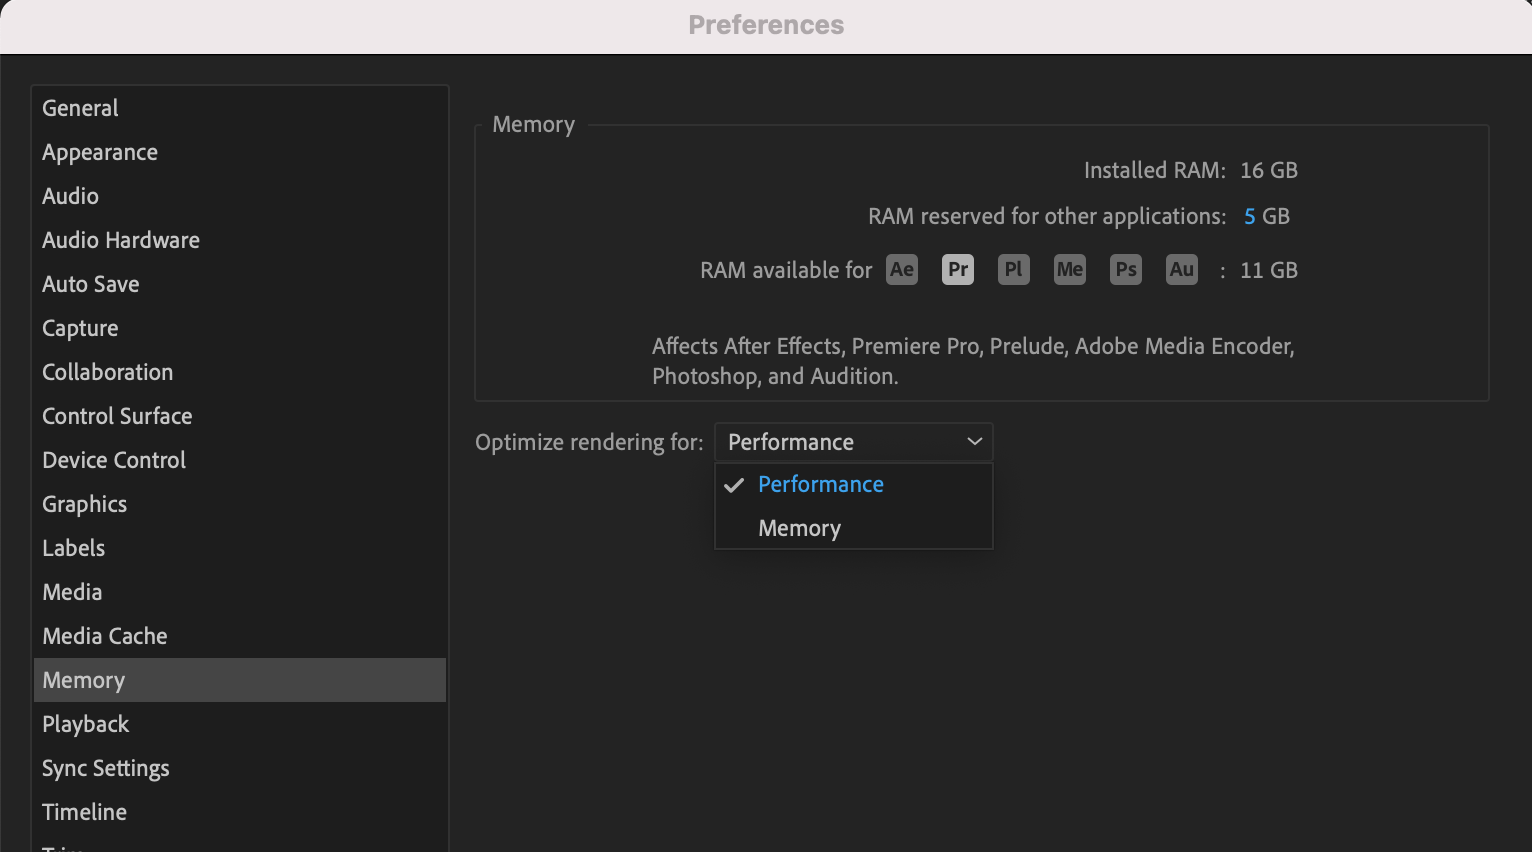
Tip #5: Allocate more RAM
It’s no secret that Premiere Pro requires a lot of memory to run. But did you know that you can allocate a specific amount of that memory just to Premiere? You can do this in your Premiere Pro preferences settings.
Go to “Preferences” and select “Memory.”

In the window that appears, you can manually change how much memory is reserved for other applications and how much you want to allot to Adobe programs. You can also choose to optimize your RAM use for either performance or for memory space.
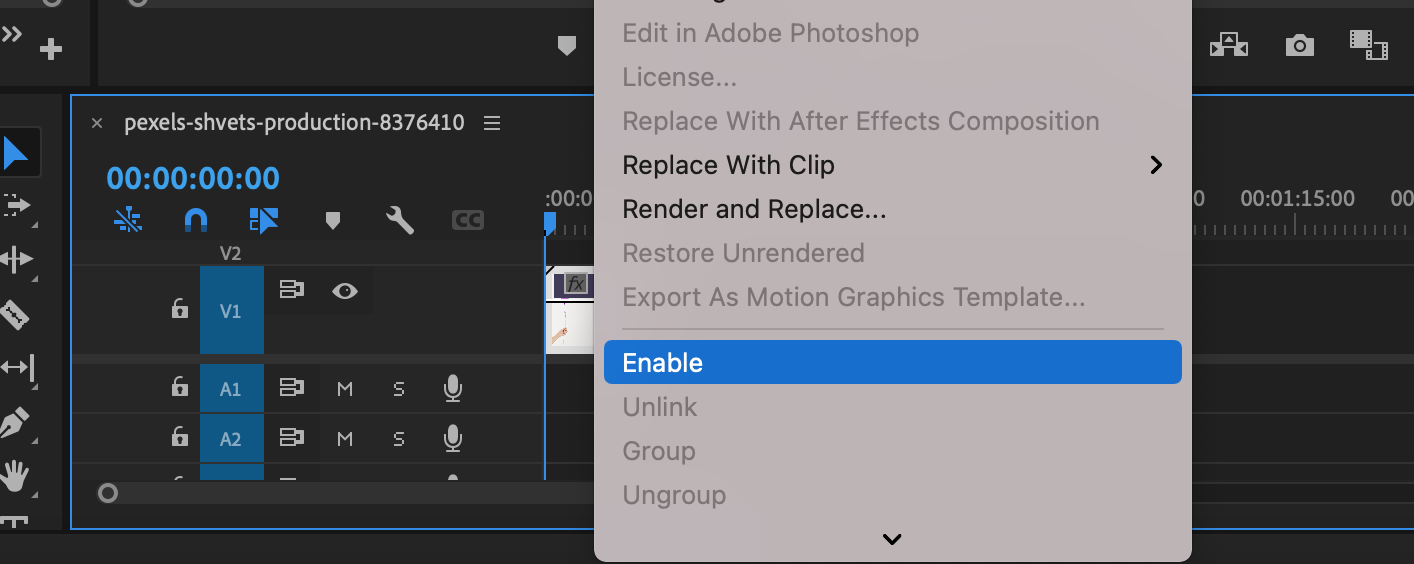
Tip #6: Disable media tracks when not in use
This is a big one. You may be working with tons of layered media tracks, and it’s easy to assume that what you don’t see isn’t hogging your performance. That couldn’t be further from the truth. If you’ve got media tracks that you’re not actively working on, disable them to free up space and improve performance.
To do this, simply right-click or Ctrl+click on the clip or track you want to disable, then un-check the “Enable” option in the dropdown. You can always re-enable this later.
Tip #7: Mute effects
Similar to disabling tracks, muting effects is a great way to improve performance without deleting anything you’re working on. Once you’ve got an effect where it needs to be, you can mute its appearance in the project so you can work on other things without lag.
To do this, simply hit the plus button at the bottom of the media preview window, go to the little fx icon, and select it to mute all effects globally.

Tip #8 Make sure your sequence settings match your clip settings
This is one that may seem obvious, but a lot of people miss it. When you’re creating your project, always make sure to create a sequence with the same settings as your clips.
Typically, when you drag a clip to the timeline that doesn’t match the sequence settings, you’ll get a prompt from Premiere asking if you want to change your sequence settings to match your clip. If you do this, you’ll save yourself a ton of rendering time and speed up your overall editing.
Tip #9: Edit using proxies
Proxies are essentially lower-information copies of your footage, effects, and other elements that Premiere Pro can create to make editing faster. Instead of handling the full data of the clip with every move, you edit the proxy file, and when you’re ready to export, Premiere Pro will replace the proxies with the full clips.
To edit with proxies, you first need to change your clip ingest settings. In your media browser, click on the little wrench to open your ingest settings window.

In your “Ingest Settings” window, you’ll want to click the check box that says “Ingest,” then select “Create Proxies” from the dropdown menu.
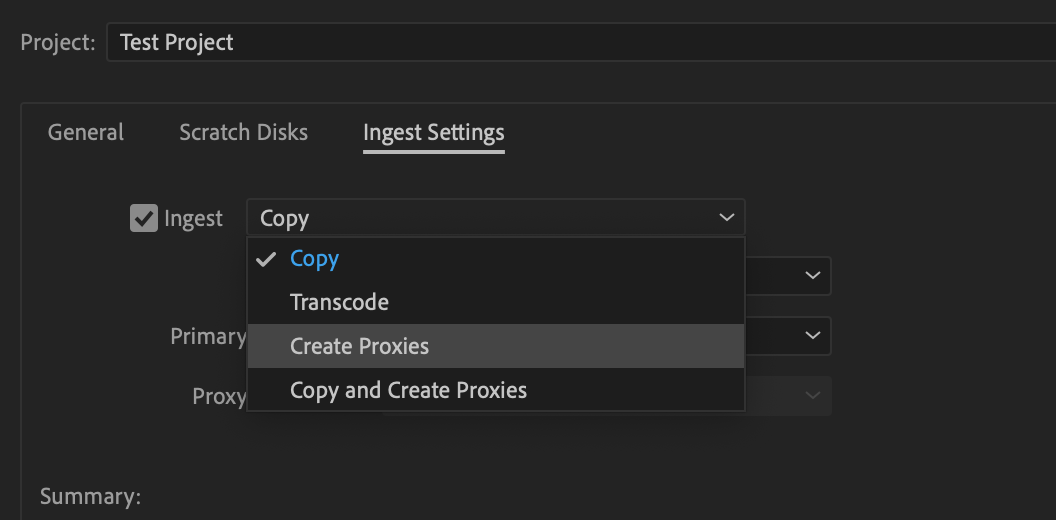
Once you’ve done this, you now need to select the resolution for your proxies. The lower the resolution, the faster your performance; however, you’ll lose more fine details in your previews.
Tip #10: Optimize your editing system
Ok, if all else fails, it’s time to look at your hardware. If you haven’t upgraded your RAM in ten years or you’re working on an old graphics card, you’re likely still going to struggle with editing HD video in Premiere.
Consider adding more RAM or upgrading your graphics card to improve performance not just in Premiere but in your system as a whole.
Improving speed is about working with your system, not against it
No two editing systems are alike, so it’s important to know the strengths and weaknesses of your hardware and software and find ways to optimize their performance, whether that means downgrading resolution to compensate for a laggy graphics card or working with proxies to improve CPU space.
We encourage you to experiment with a few or all of these techniques to help speed up Premiere Pro and get you editing faster than ever before.
And if you’re looking for a better way to bring your remote video production team closer together and collaborate more efficiently from a distance, check out Evercast.
Evercast allows you to stream your Premiere Pro edit sessions in full HD while video chatting and exchanging notes with your team. Make collaborative video editing smooth and efficient, not slow and painful.


.avif)


.avif)


.avif)