


As you start layering different elements into your After Effects composition and applying things like motion effects and other transformations, anchor points become a very important part of your motion graphics workflow.
If you're just getting started with the After Effects interface, you may be wondering, "What's an anchor point, and why do I need to center it?" Don't worry, like always, we've got you covered.
We've compiled this short guide to anchor points and how to center them, so you can animate like a pro in After Effects.
What Are “Anchor Points” in After Effects?
An anchor point is a point on an element from which all types of transformations will originate. This point "anchors" whatever action you will take on that element, whether that be a change in size, position, etc. This is important to understand because it will radically change how an element transforms based on where the anchor point is set.
For most transformations, you will likely prefer a central anchor point. This means all transformations will evenly distribute from the center of your selected element. However, the default positioning for anchor points in After Effects is often off-center, so you'll need to know how to bring your anchor point to the center of your element.
How to Center The Anchor Point in After Effects
You can center your anchor point by either using a keyboard shortcut or navigating your editing menus.
Here’s an example of the default anchor point for a text layer. As you can see, the anchor point is at the bottom left corner of the text. We want to transform our text to get larger over time while staying in the same spot, so we want to center this anchor point.

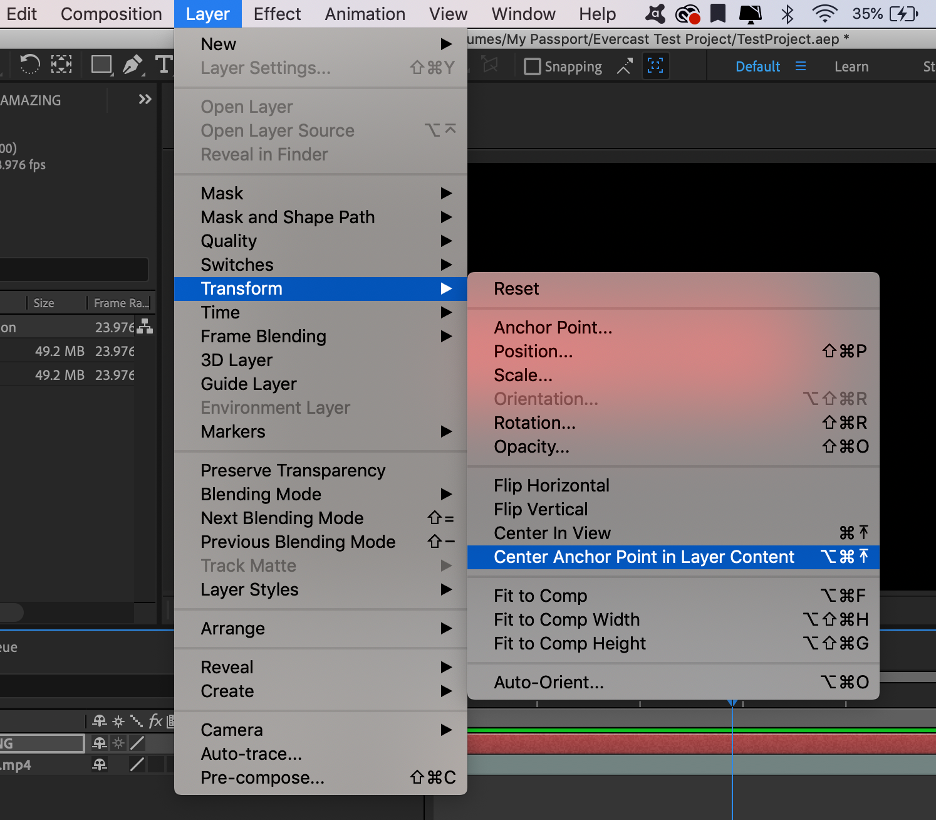
To set the anchor point to the center using your After Effects menus, follow these steps:
Step 1: Select “Layer” in your top menu
Step 2: Select “Transform” from the dropdown menu
Step 3: Select “Center Anchor Point in Layer Content”
And voila, you now have a central anchor point that looks like this:
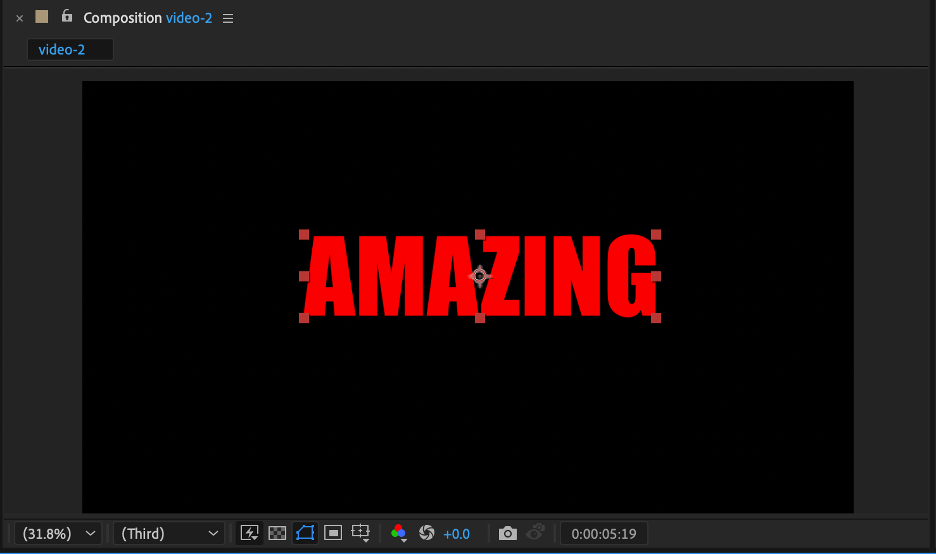
Now any transformation effects will originate from the center instead of the bottom left.
Create together remotely, in real time
How to Set Your Default Anchor Point to The Center
Now, if you find yourself needing a center anchor point more often than not, you can set your default anchor point to populate in the center of the layer instead of the corner.
Follow these steps to set your default anchor point to the center of the layer:
Step 1: Go to "Preferences" under the "After Effects" menu.
Step 2: Select “General”

Step 3: Click the check box next to “Center Anchor Point in New Shape Layers”

Now your anchor point will default to the center when you create a new shape layer such as text or other shapes.
Shortcuts in After Effects for anchor points
To center the anchor point of your selected layer using a keyboard shortcut, select the layer, then use these shortcuts:
- Mac: CMD + Option + Home (if you do not have a home key on your keyboard, hold fn and press the left arrow key)
- PC: CTRL + Alt + Home
These shortcuts will center your layers anchor point to the center of your selected layer automatically.
How to Manually Adjust Your Anchor Point
You may not want to perfectly center your anchor point and instead want to move it around your layer. Here's how you can place your anchor point precisely where you want it without moving your layer around in your composition:
Step 1: Activate the “Pan Behind” tool by clicking on the icon in your toolbar (seen here in blue)

Step 2: Locate your anchor point and click and drag it to move it to your desired position.

Once you’ve placed your anchor point in your desired position, deselect the pan-behind tool and continue editing as you like.
In summary…
Anchor points are literally the lynchpin of your After Effects transformations, so keep this guide on hand to help you move and manipulate your anchor points until you’re a pro. Keep playing and experimenting with your anchor points until you get the perfect transformations for any of your animating and special effects needs.
If you’re looking for a better way to bring your remote editing team closer together and collaborate more efficiently from a distance, check out Evercast. Evercast allows you to stream your edit sessions in HD while video chatting and exchanging notes with your team, all under one platform. Because we believe collaboration is the magic behind the movies.


.avif)


.avif)


.avif)