


A key part of any motion graphics or animation work is making everything you add look like it belongs in the scene naturally and hasn't been "artificially" added. A great technique for blending objects more seamlessly in your compositions is to add motion blur.
We’ve compiled a handy tutorial to help you understand motion blur and how you can use it to seamlessly blend elements in your video projects or even create stylized effects.
What is Motion Blur?
Motion blur is the visual effect that’s naturally created due to a combination of the movement of objects and the shutter speed of the camera capturing them. This effect also happens naturally with our eyes when we move our heads quickly from side to side, but it isn't something we notice, thanks to our brains "editing" it for us.
However, what viewers do notice is any lack of motion blur. When things are in motion on the screen, especially fast motion, and do not have a blurred effect, it can be jarring and unnatural to watch. That's why visual effects artists often add in digital motion blur to their effects to match what the viewer expects to see if that element were to be in the scene in reality.
There are several ways to add motion blur in Adobe After Effects using different visual effects, motion graphics, and compositing techniques.
How to Add Motion Blur in After Effects
The first and simplest way to add motion blur in After Effects is with the motion blur toggle in your layer settings.
If you want to add motion to, for example, a text element and want to make sure that text movement includes motion blur, here’s how:
Step 1: Select a moving layer you want to add motion blur to in your timeline
Step 2: Click on the “Enable Motion Blur for all layers with the Motion Blur Set” above your layer menu in the toolbar.
It will look like this:

Step 3: Click the toggle box for “Enable Motion Blur” on the layer toolbar for the layer you want to apply motion blur on.
Here’s the toolbar with the motion blur turned off:

And here it is with the motion blur turned on:

If you look at your element, you should now see a blur effect applied to the element in motion like so:

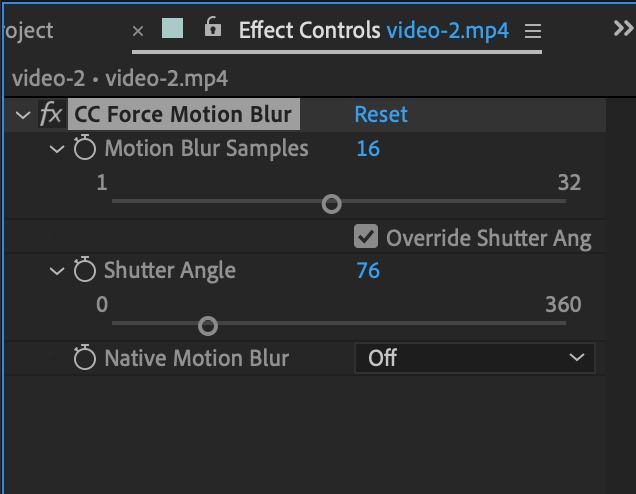
This is a good quick and basic way to add motion blur to simple elements like this. However, if you want to add more stylized motion blur to a video clip and have a bit more control over the effect, try using the CC Force Motion Blur effect. Here’s how:
Step 1: Select the clip you want to apply motion blur to.
Step 2: Go to the "Effect" menu, select "Time," then select "CC Force Motion Blur"

Create together remotely, in real time
Step 3: Adjust the shutter angle and Motion Blur Samples until you get your desired amount of motion blur.
Make sure when you're manipulating this effect, you check the box that says "Override Shutter Angle" to ensure that your applied effects override the native shutter speed.
Once you're finished, playback your video to be sure your motion blur is how you want it.
When to Add Motion Blur to Your Footage
Deciding when and where to add motion blur to your footage is ultimately a creative choice. However, here are some of the most common reasons you may want to add artificial motion blur to your footage:
- You accidentally shot with too high of a shutter speed (shutter angle), and your motion looks choppy and "home video" like.
- You want to create a more “cinematic” effect with videos shot at a higher shutter speed or frame rate.
- You added in visual effects elements during a fast-moving scene and want them to blur at the same rate as your native footage.
- You want to make objects in your frame appear to be moving faster than they actually are.
- You want to simulate a faster camera movement.
These are just examples of good times to use the motion blur effect to your footage, but let your creativity drive you!
Some Other Unique Stylized Blur Effects to Add to Your Videos
While these are two common ways to add motion blur to your videos, you can also try some of these effects to add different blur effects to your videos:
- Timewarp Effect: This effect not only allows you to add motion blur, but it also allows you to slow down and speed up your footage for fast and slow-motion effects.
- Pixel Motion Blur: This is another time effect, and it synthesizes the effect of motion blur using motion vectors. This is ideal for applying motion blur to computer-generated motion.
In addition to these built-in effects, you can also use advanced motion blur plug-ins that are created by third parties to give you specific kinds of motion blur, such as anime, "matrix," or other unique effects.
The key to mastering any of these effects is to keep experimenting to see which ones work best for your projects. Some editors prefer certain techniques over others, so it all comes down to what you feel most comfortable with.
If you’re looking for a better way to bring your remote editing team closer together and collaborate more efficiently from a distance, check out Evercast. Evercast allows you to stream your edit sessions in HD while video chatting and exchanging notes with your team, all under one platform. Because we believe collaboration is the magic behind the movies.
Additional After Effects Tutorials


.avif)


.avif)


.avif)