


If you’re getting started in visual effects creation, likely you’ve heard the word keyframe thrown around a lot.
Keyframes are one of the most important elements in any post-production workflow, as they form the base on which everything is built, from animations to refined color correction.
In this guide, we’ll walk you through the basics of keyframing in Adobe After Effects; what they are, what they do, and how you can use them in your next project.
What is a Keyframe?
Put simply, a keyframe is a time marker that tells your effects program where you want to change something. This can be size, position, opacity, color, or any other kind of value shift.
When you add keyframes and use them to apply new values to the elements in your image, you begin to create special visual effects on your image.
Why Does After Effects Need Keyframes?
For After Effects to make changes that take place over a certain amount of time, for example, making text grow larger as a clip plays, it needs to know how big and over how long a timespan you want this to occur.
Keyframes give After Effects the information it needs to know when you want something to change and how. You can set these keyframes manually in After Effects, or utilize certain auto-keyframing tools to create your keyframes.
How to Add a Keyframe in After Effects
Setting new keyframes in After Effects is a relatively straightforward process. Once you get the hang of it, it’ll become a nearly reflexive part of your visual effects workflow.
Here are the basic steps to adding a keyframe in After Effects:
Step 1: Place your CTI where you want your keyframe effect to start
Step 2: Choose what property you’d like to create an effect with
This could be scale, position, opacity, rotation, etc.
Step 3: Click the arrow to the left of your layer name to open the drop-down menu
Step 4: Open up the “Transform” drop down and locate the property you want to keyframe
Step 5: Click the stopwatch next to that property to set your first keyframe

Your timeline should look something like this.
Congratulations, you’ve now set your first keyframe! However, to create an effect, you’ll need more than one keyframe, so let’s set a second one to create our desired animation. In this case, we’re going to make the word “Adventure” grow over time.
Create together remotely, in real time
Step 6: Move your CTI to the point where you want your effect to end.
Step 7: Click the diamond button to the far left of your property or use the keyboard shortcut (Option + the property shortcut, in this case, S)
Step 8: Change the value of the property at the second keyframe to what you’d like the final value to be.
In this case, we’re going to have our text grow by 300% overall, so we enter that in.
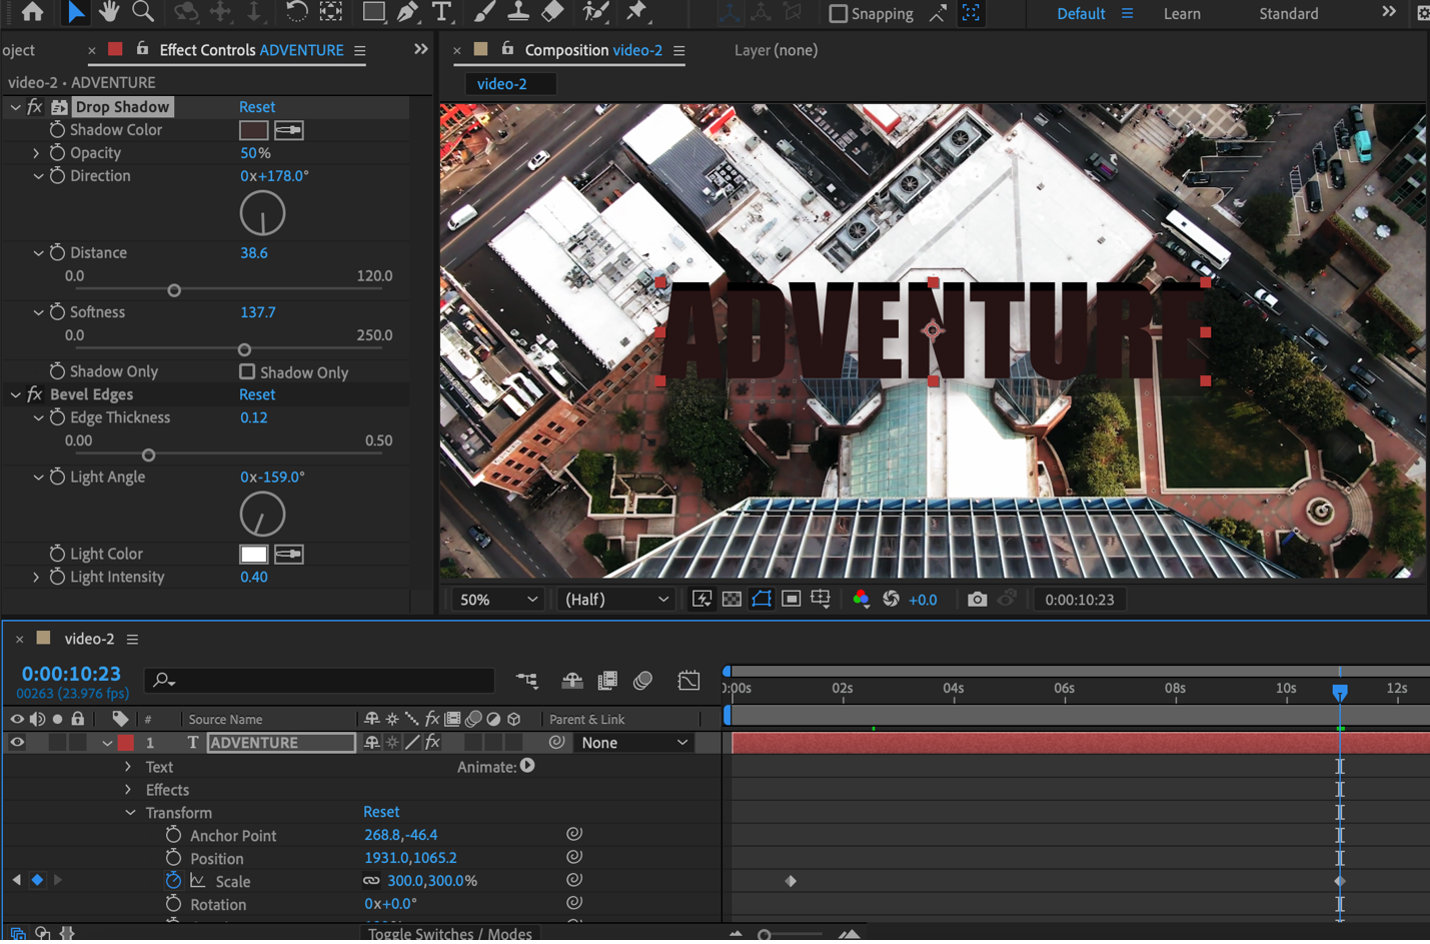
Step 9: Take your CTI back to the original position and hit the spacebar to see your text layer change from keyframe to keyframe.
Now you’ve got a slowly growing text effect!
How to Remove or Move a Keyframe in After Effects
Now, say you want to make edits to your keyframes after you’ve placed them. Thankfully, After Effects makes this quite simple.
To Remove a Single keyframe:
Step 1: Click on the keyframe you want to remove
Step 2: Press the “delete” key to delete the keyframe
To Remove All Keyframes in a Certain Effect:
Step 1: Go to the transform panel and locate the property that the keyframes are attached to
Step 2: Click the active stopwatch to deactivate it and remove all the keyframes associated with it
Sometimes you just want to move a keyframe instead of delete it, here’s how:
Step 1: Select the keyframe you want to move
Step 2: Use your pointer tool to click and drag the keyframe to its new position
If you want to move multiple keyframes, follow these steps:
Step 1: Click on the timeline and drag to create a marquee and select all of the keyframes you want to move.
Step 2: Drag the keyframes together to their new position
If you want to lengthen the timespan the keyframes cover while preserving their proportional spacing, you can do that too:
Step 1: Follow step one above to select the keyframes you want to move
Step 2: Hold down the Option/Alt key while dragging a keyframe with your mouse. This will expand the keyframes across a longer timespan while preserving their spacing.
Keep Experimenting with Keyframes to Create Millions of Effects
Keyframes are the backbone of motion graphics, and the more you get comfortable using them, the better an animator you will become. You can change the size, position, color, angle and many more properties of your videos and graphics using keyframes.
If you’re looking for a better way to bring your remote editing team closer together and collaborate more efficiently from a distance, check out Evercast. Evercast allows you to stream your edit sessions in HD while video chatting and exchanging notes with your team, all under one platform. Because we believe collaboration is the magic behind the movies.


.avif)


.avif)


.avif)