


There are typically two stages of learning in Pro Tools. The first stage is what we call “learning how to use Pro Tools.” This is where you learn the essential functions and capabilities of Pro Tools and how to apply them to your project.
The second stage is one we like to call “learning how to use Pro Tools efficiently,” which is where you learn that you’ve been doing everything the hard way and find ways to streamline your workflow so you can finish faster. In this stage, you’ll master edit tools and edit modes that help you fine tune your projects to perfection.
Learning how to nudge in Pro Tools falls squarely into the second stage, and once you know how to do it, you’ll wonder how you ever edited without out.
What is a “nudge” in Pro Tools?
“Nudging” is an action in Pro Tools that allows you to make an edit selection and move a region or section either left or right by a predetermined amount of space. This is an essential function for efficient editing, as it allows you to move entire segments within a track or between tracks by a set amount of bars, beats, or seconds.
Say you have a four-bar piano measure you love, but you decide it would work better if it were inserted twelve bars later to overlay a different part of the percussion line.
However, this piano measure is also layered with a violin solo, and you don’t want them to slip out of harmony. With nudging, you can grab both the piano bars and the violin solo and move them precisely twelve bars later, together.
Using nudges will speed up your editing and make it much more precise.
How to nudge in Pro Tools
Follow these simple steps to nudge a clip, selection, or segment in Pro Tools:
Step 1: Open your Pro Tools session (or create a new one).
Step 2: Set the time scale and value of your nudge.
Before you start nudging clips, first decide what scale you’ll be using (for example, bars/beats, minutes/seconds, or timecode) and how much of that scale you want to nudge each clip by.
To do this, locate the nudge pop-up menu. You should see a value window at the top of your Pro Tools session that displays “Grid” and “Nudge” next to their respective values. Next to the nudge value, you will see a small arrow. Click this arrow to access the nudge value pop-up menu.
Create together remotely, in real time
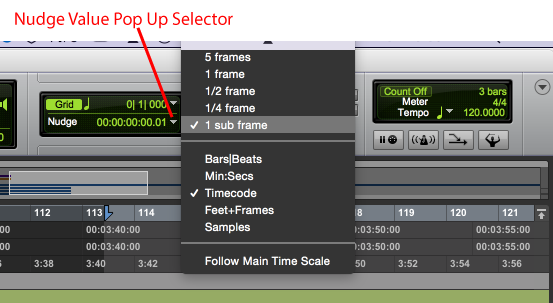
Once you’re in the nudge pop-up menu, select the timescale you’d like to use, and then select the amount by which you’d like to nudge.
Step 3: Select the clips or segments you’d like to nudge.
You can do this by using your selector tool, or “grabber tool”, to select either a single clip or a segment of clips. Identify the start time of the clip and the end time of the clip with the edit cursor.
Step 4: Use the nudge shortcut to nudge your clip(s).
The easiest way to nudge is by using your keyboard shortcuts. To nudge a desired clip, simply click either the plus or minus keys on your numeric keypad. Pressing the plus key will move your selection backward by the predetermined nudge amount, and pressing the minus key will drag it forwards.
That’s it! Now you can nudge your clips to make editing faster and easier.
Different types of nudges in Pro Tools
There are a few different nudge values that you can use in Pro Tools. We’ve outlined them below, so you know which one will work best for your project.
- Bars|Beats: This nudges your clips by a set amount of bars (also known as measures) in a project. This is best used in an audio track project where you’ve set up your project to reflect an accurate division of bars based on the project’s tempo.
- Min|Sec: This one should be relatively self-explanatory. It allows you to make a timeline selection and nudge based on a certain amount of minutes and/or seconds in your project time.
- Timecode: This is a great option to use when working with audio for a video project and editing your project based on a specific timecode. This allows you to set your nudge value based on that running timecode instead of bars or measures like you would for a purely music-based project.
- Feet + Frames: This is another great one for video audio. If you’re editing audio for a project that uses feet/frames (this is primarily only seen on projects that are shot on film), you can set your nudge to this value.
- Samples: This is one for our mixers. If your project is based on samples, you can set your nudge value to move by a certain number of samples.
Final thoughts
Hopefully, this guide will help you streamline your editing workflow and give you that “aha!” breakthrough that will allow you to edit your entire track list faster and more efficiently than ever before. Be sure to save this guide for easy reference until you get the hang of using this new tool on all your projects, and learn more about how to master Pro Tools.
And if you’re looking for a better way to bring your remote audio production team closer together and collaborate more efficiently from a distance, check out Evercast.
Evercast allows you to stream your Pro Tools, Logic Pro X, Ableton Live, or even Garageband edit sessions in HD while video chatting and exchanging notes with your team in real-time, all under one platform, so you stay in flow while you’re in edit mode.


.avif)


.avif)


.avif)